Kubernetes Labels & Deployments
Understanding Labels
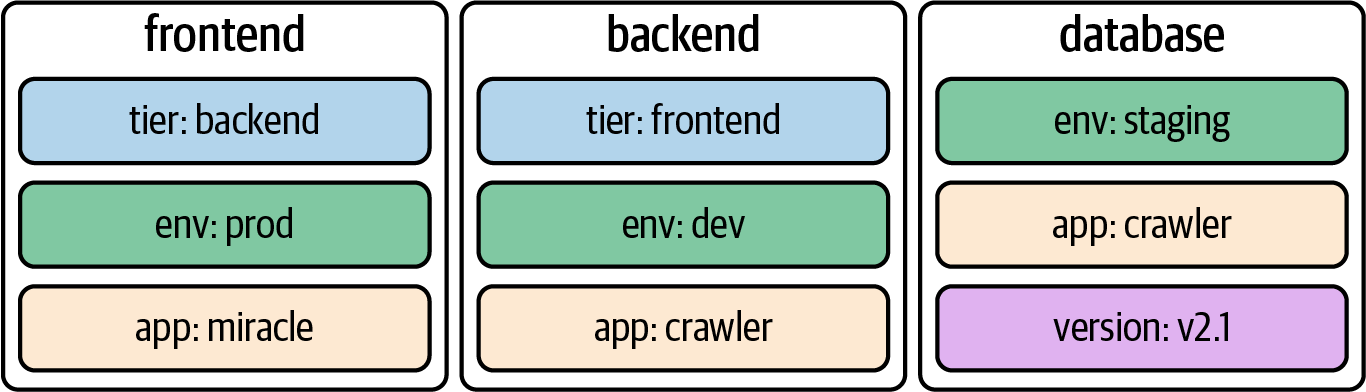
Kubernetes lets you assign key-value pairs to objects so that you can use them later within a search query. Those key-value pairs are called labels. To draw an analogy, you can think of labels as tags for a blog post. A label describes a Kubernetes object in distinct terms (e.g., a category like “frontend” or “backend”) but is not meant for elaborate, multi-word descriptions of its functionality. As part of the specification, Kubernetes limits the length of a label to a maximum of 63 characters and a range of allowed alphanumeric and separator characters.
It’s common practice to assign one or many labels to an object at creation time; however, you can modify them as needed for a live object. When confronted with labels for the first time, they might seem like an insignificant feature—but their importance cannot be overstated. They’re essential for understanding the runtime behavior of more advanced Kubernetes objects like a Deployment and a Service.
Declaring Labels
Labels can be declared imperatively with the run command or declaratively in the metadata.labels section in the YAML manifest. The command-line option --labels (or -l in its short form) defines a comma-separated list of labels when creating a Pod. The following command creates a new Pod with two labels from the command line:
kubectl run labeled-pod --image=nginx --restart=Never --labels=tier=backend,env=dev
Assigning labels to Kubernetes objects by editing the manifest requires a change to the metadata section.
apiVersion: v1
kind: Pod
metadata:
  name: labeled-pod
  labels:
    env: dev
    tier: backend
spec:
  containers:
  - image: nginx
    name: nginx
Inspecting Labels
You can inspect the labels assigned to a Kubernetes object from different angles. Here, we’ll want to look at the most common ways to identify the labels of a Pod. As with any other runtime information, you can use the describe or get commands to retrieve the labels:
kubectl describe pod labeled-pod | grep -C 2 Labels:
kubectl get pod labeled-pod -o yaml | grep -C 1 labels:
If you want to list the labels for all object types or a specific object type, use the --show-labels command-line option. This option is convenient if you need to sift through a longer list of objects. The output automatically adds a new column named LABELS:
kubectl get pods --show-labels
NAME          READY   STATUS    RESTARTS   AGE   LABELS
labeled-pod   1/1     Running   0          38m   env=dev,tier=backend
Understanding Deployments
At the beginning, we discussed labels and label selection from all angles. We did so for a good reason. A Deployment is one of the Kubernetes primitives that uses labels as a foundational concept. If you didn’t have a chance to fully brush up on labels, I’d urge you to review the content.
Running an application inside of a Pod is powerful, but scalability and reliability can become a problem. Say the load on your application increases during peak times or because of a growing user base, and you still have only one Pod instance that can serve up the application’s functionality. With increased traffic comes higher resource consumption. Depending on the resource requirements of the container, the application may come to a grinding halt.
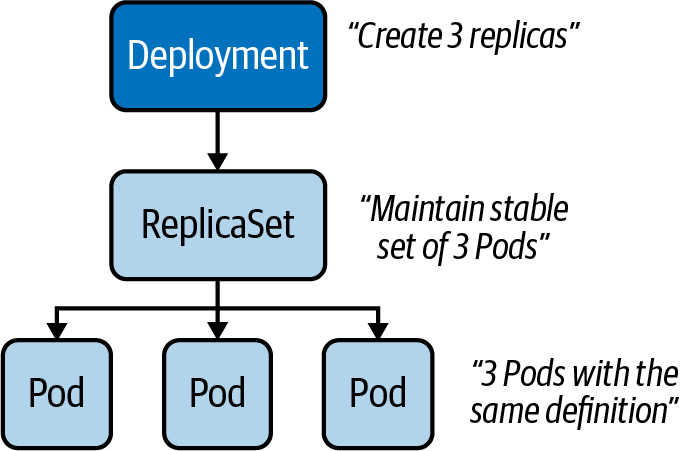
That’s where a Deployment comes in. Within a Deployment, you can specify the number of Pods running your application with the exact same setup. Need to scale up? Simply bump up the number of replicas, and Kubernetes will take care of creating the Pods. Furthermore, the Deployment ensures that failing Pods are restarted so that the actual state matches with the desired state. Under the hood, a Deployment uses the Kubernetes primitive ReplicaSet, as shown below.
The ReplicaSet’s sole purpose is to replicate a guaranteed number of Pods with the same configuration.
Creating Deployments
Deployments can be created imperatively with the create deployment command. The options you can provide to configure the Deployment are somewhat limited and do not resemble the ones you know from the run command. The following command creates a new Deployment that uses the image nginx:1.14.2 for a single replica:
kubectl create deployment my-deploy --image=nginx:1.14.2
Often, you will find yourself generating and further modifying the YAML manifest. The following manifest creates a Deployment with a single replica. If you look closely, you will see label selection in action. The selector spec.selector.matchLabels matches on the key-value pair app=my-deploy with the label defined under the template section, as shown below:
apiVersion: apps/v1
kind: Deployment
metadata:
  name: my-deploy
  labels:
    app: my-deploy
spec:
  replicas: 1
  selector:
    matchLabels:
      app: my-deploy
  template:
    metadata:
      labels:
        app: my-deploy
    spec:
      containers:
      - name: nginx
        image: nginx:1.14.2
Listing Deployments
Once created, a Deployment and all of its corresponding objects can be listed. The following get command lists all Deployments, Pods, and ReplicaSets. If a Pod or ReplicaSet is managed by a Deployment, the name of the object will reflect that connection. For the Deployment named my-deploy, you will find at least one Pod and one ReplicaSet with the prefix my-deploy- plus a random hash:
kubectl get deployments,pods,replicasets
Rendering Deployment Details
You can inspect the details of a Deployment using the describe command. Not only does the output provide information on the number and availability of replicas, it also presents you with the reference to the ReplicaSet. Inspecting the ReplicaSet or the replicated Pods renders references to the parent object managing it:
kubectl describe deployment.apps/my-deploy
kubectl describe replicaset.apps/my-deploy-8448c488b5
kubectl describe pod/my-deploy-8448c488b5-mzx5g
Rolling Out a New Revision
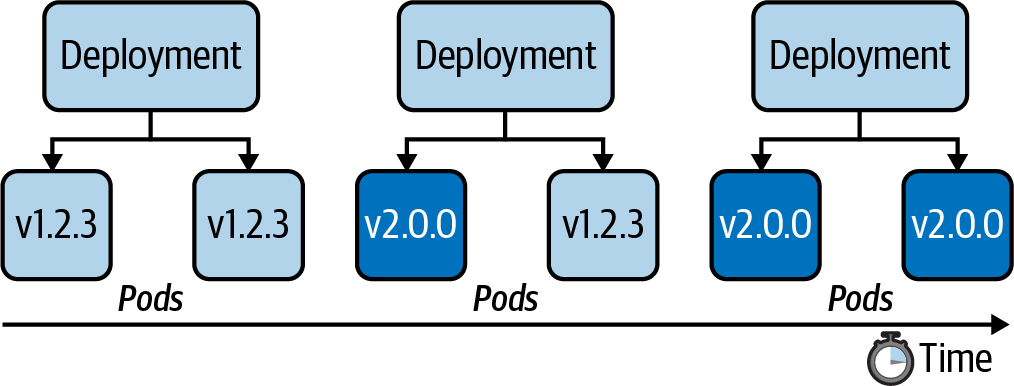
Application development is usually not stagnant. As part of the software development lifecycle, you build a new feature or create a bug fix and deploy the changes to the Kubernetes cluster as part of the release process. In practice, you’d push a new Docker image to the registry bundling the changes so that they can be run in a container. By default, a Deployment rolls out a new container image using a zero-downtime strategy by updating Pods one by one. The following figure shows the rolling update process for a Deployment controlling two replicas from version 1.2.3 to 2.0.0.
Every Deployment keeps a record of the rollout history. Within the history, a new version of a rollout is called a revision. Before experiencing the rollout of a new revision in practice, let’s inspect the initial state of the Deployment named my-deploy. The rollout command shows revision 1, which represents the creation of the Deployment with all its settings:
# should show only one revision
kubectl rollout history deployment my-deploy
In the next step, we will update the container image used on the Deployment from nginx:1.14.2 to nginx:1.19.2. To do so, either edit the live object or run the set image command:
kubectl set image deployment my-deploy nginx=nginx:1.19.2
Looking at the rollout history again now shows revision 1 and 2. When changing the Pod template of a Deployment—for example, by updating the image—a new ReplicaSet is created. The Deployment will gradually migrate the Pods from the old ReplicaSet to the new one. Inspecting the Deployment details reveals a different name—in this case, my-deploy-775ccfcbc8:
$ kubectl rollout history deployment my-deploy
deployment.apps/my-deploy
REVISION  CHANGE-CAUSE
1         <none>
2         <none>
$ kubectl describe deployment.apps/my-deploy
...
NewReplicaSet:   my-deploy-775ccfcbc8 (1/1 replicas created)
...
$ kubectl rollout status deployment my-deploy
deployment "my-deploy" successfully rolled out
NOTE
By default, a Deployment persists a maximum of 10 revisions in its history. You can change the limit by assigning a different value to spec.revisionHistoryLimit.
You can also retrieve detailed information about a revision with the rollout history command by providing the revision number using the --revision command-line option. The details of a revision can give you an indication of what exactly changed between revisions:
$ kubectl rollout history deployments my-deploy --revision=2
deployment.apps/my-deploy with revision #2
Pod Template:
  Labels:	app=my-deploy
	pod-template-hash=9df7d9c6
  Containers:
   nginx:
    Image:	nginx:1.19.2
    Port:	<none>
    Host Port:	<none>
    Environment:	<none>
    Mounts:	<none>
  Volumes:	<none>
The rolling update strategy ensures that the application is always available to end users. This approach implies that two versions of the same application are available during the update process. As an application developer, you have to be aware that convenience doesn’t come without potential side effects. If you happen to introduce a breaking change to the public API of your application, you might temporarily break consumers, as they could hit revision 1 or 2 of the application. You can change the default update strategy of a Deployment by providing a different value to the attribute strategy.type; however, consider the trade-offs. For example, the value Recreate kills all Pods first, then creates new Pods with the latest revision, causing a potential downtime for consumers.
Rolling Back to a Previous Revision
Despite the best efforts to avoid them by writing extensive test suites, bugs happen. Not only can the rollout command deploy a new version of an application, you can also roll back to an earlier revision. In the previous section, we rolled out revisions 1 and 2. Assume revision 2 contains a bug and we need to quickly revert to revision 1. The following command demonstrates the process:
kubectl rollout undo deployment my-deploy --to-revision=1
If you look at the rollout history, you’ll find revisions 2 and 3. Kubernetes recognizes that revisions 1 and 3 are exactly the same. For that reason, the rollout history deduplicates revision 1 effectively; revision 1 became revision 3:
kubectl rollout history deployment my-deploy
The rollback process works pretty much the same way as rolling out a new revision. Kubernetes switches back to the “old” ReplicaSet, drains the Pods with the image nginx:1.19.2, and starts new Pods with the image nginx:1.14.2.
Manually Scaling a Deployment
The scaling process is completely abstracted from the end user. You just have to tell the Deployment that you want to scale to a specified number of replicas. Kubernetes will take care of the rest.
Say we wanted to scale from one replica to five replicas, as shown below:
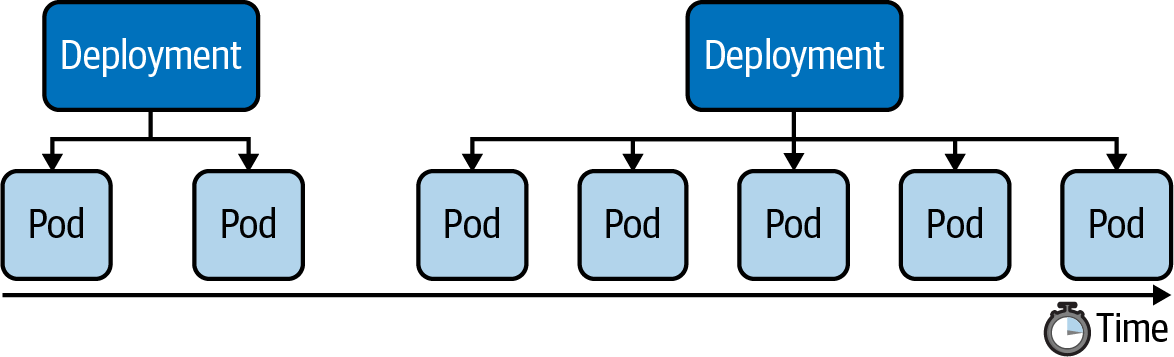
We have two options: using the scale command or changing the value of the replicas attribute for the live object. The following command show the effect of scaling up a Deployment:
kubectl scale deployment my-deploy --replicas=5
A Deployment records scaling activities in its events, which we can view using the describe deployment command:
kubectl describe deployment.apps/my-deploy
Horizontal Pod Autoscaler
The Horizontal Pod Autoscaler doesn't come pre-installed with Docker Desktop. Follow this tutorial on how to install it.
A Deployment can be autoscaled using the autoscale deployment command. Provide the name and the thresholds you’d like the autoscaler to act upon. In the following example, we’re specifying a minimum of 2 replicas at any given time, a maximum number of 8 replicas the HPA can scale up to, and the CPU utilization threshold of 70%. Listing the HPAs in the namespace reflects those numbers. You can use the primitive name horizontalpodautoscalers for the command; however, I prefer the short-form notation hpa:
kubectl autoscale deployment my-deploy --cpu-percent=70 --min=2 --max=8
The current status of the HPA shows the upper CPU threshold limit but renders <unknown> for the current CPU consumption. That’s usually the case if the metrics server is not running, is misconfigured, or if the Pod template of the Deployment doesn’t define any resource requirements. Check the events of the HPA using the command kubectl describe hpa my-deploy.
Here's the YAML manifest for an HPA:
apiVersion: autoscaling/v2
kind: HorizontalPodAutoscaler
metadata:
  name: autoscaler
spec:
  scaleTargetRef:
    apiVersion: apps/v1
    kind: Deployment
    name: nginx-deployment
  minReplicas: 1
  maxReplicas: 5
  metrics:
  - type: Resource
    resource:
      name: cpu
      target:
        type: Utilization
        averageUtilization: 50
Summary
Labels are one of the central concepts that control the runtime behavior of more advanced Kubernetes objects. For example, in the context of a Deployment, label selection is used to select the Pods the Deployment manages. You can use labels to select objects based on a query from the command line or within a manifest if supported by the primitive’s API. Annotations serve a different purpose—they are only meant for providing human-readable, informative metadata and can be used for querying objects.
The Deployment is an essential primitive for scaling an application by running it in multiple replicas. The heavy lifting of managing those replicas is performed by a ReplicaSet. Application developers do not have to interact directly with the ReplicaSet; a Deployment handles it under the hood. Deployments come with the capability to easily roll out and roll back revisions of the application represented by an image running in the container. You learned about the commands for controlling the revision history and its operations. Scaling a Deployment manually requires deep insight into the requirements and the load of an application. A Horizontal Pod Autoscaler can automatically scale the number of replicas based on CPU and memory thresholds observed at runtime.