Outline
Weekly Schedule
| Week | Module |
|---|---|
| 1 | Terraform Brush-up |
| 2 | Terraform Backends |
| 3 | Event-Based Architecture on AWS |
| 4 | AWS Batch Jobs |
| 5 | Getting Started with Kubernetes |
| 6 | Kubernetes Pods |
| 7 | Kubernetes Namespaces |
| 8 | Kubernetes Configs & Secrets |
| 9 | Reading Week |
| 10 | Kubernetes Labels |
| 11 | Kubernetes Deployments |
| 12 | Kubernetes Deployments |
| 13 | Kubernetes Jobs |
| 14 | Kubernetes Services |
| 15 | Final |
Assesment
| Module | Weight |
|---|---|
| In-class Activities | 20% |
| Assignment 01 | 20% |
| Assignment 02 | 20% |
| Project | 40% |
Terraform (brush-up)
Setting up an AWS Account
-
Refer to this document to set up your AWS account.
-
Refer to this document to create an IAM user. For simplicity, attach the
AdministratorAccessIAM policy to the user so we won't run into permission issues. Just as an FYI, this is against security best practices, but we will fix this later. -
Generate access key ID and secret access key for the user you created in the previous step. Refer to this [document] (https://docs.aws.amazon.com/powershell/latest/userguide/pstools-appendix-sign-up.html).
-
Install AWS CLI. Refer to this document.
-
Install AWS Vault from here.
Install Terraform
For MacOS:
brew tap hashicorp/tap
brew install hashicorp/tap/terraform
For Windows:
choco install terraform
Checkout the official documentation for other platforms.
Make sure terraform is installed:
terraform
Usage: terraform [global options] <subcommand> [args]

The available commands for execution are listed below.
The primary workflow commands are given first, followed by
less common or more advanced commands.

Main commands:
  init          Prepare your working directory for other commands
  validate      Check whether the configuration is valid
  plan          Show changes required by the current configuration
  apply         Create or update infrastructure
  destroy       Destroy previously-created infrastructure
...
Terraform needs to have access to your AWS credentials (the ones you created in the previous step). There are several ways to do this and we will cover most of them as we go forward.
For now, you can have your credentials as environment variables for Terraform to access them:
export AWS_ACCESS_KEY_ID=xxxxxxx
export AWS_SECRET_ACCESS_KEY=xxxxxx
Note that this approach only works in your current shell. If you open up a new shell, they'll be gone.
Another way is to use aws-vault which you installed in the previous step.
aws-vault exec dev -- terraform apply
Creating a Simple Server
Terraform code is written in the HashiCorp Configuration Language (HCL) in files with the extension .tf. It is a declarative language, so your goal is to describe the infrastructure you want, and Terraform will figure out how to create it. We'll start by deploying a simple server on AWS.
Start by creating a file named main.tf:
terraform {
  required_providers {
    aws = {
      version = ">= 4.0.0"
      source = "hashicorp/aws"
    }
  }
}
Download the AWS plugin for Terraform:
terraform init
This will download the required plugin and put it in the .terraform folder. We don't commit this folder to version control. So, let's make the current directory a git repo and add a .gitignore file to exclude the .terraform folder (along with other files and folders).
Initialize a git repo:
git init
Create a .gitignore file and set it up as discribed on this page.
Add a provider block to your main.tf to specify an AWS region:
provider "aws" {
  region = "ca-central-1"
}
Now it's time to add a resource. Resources in Terraform are declared as below:
resource "<PROVIDER>_<TYPE>" "<NAME>" {
  [CONFIG ...]
}
Where the PROVIDER is the plugin you're using (in this case, AWS); TYPE is the type of resource you want to create (in this case, EC2); NAME is the local name you give to the resource; and CONFIG is the arguments specific to the resource. Here's an example for an Ubuntu server in the ca-central-1 region.
resource "aws_instance" "example" {
  ami           = "ami-0b6937ac543fe96d7"
  instance_type = "t2.micro"

  tags = {
    Name = "bvc"
  }
}
Terraform binary contains a formatting tool to format your tool. It is highly recommended to do so, as it will improve readibility.
terraform fmt
Validate your code to catch any syntax errors withing your Terraform code:
terraform validate
If you get this message, you're good to go:
Success! The configuration is valid.
Before creating the instance, it's recommended to see what Terraform calls the Plan. It shows the changes to be made before actually making them. This is a great way to make sure we're not accidentally making a change we're not supposed to. See the plan with this command:
terraform plan
You should see an output similar to this:
Terraform will perform the following actions:

  # aws_instance.example will be created
  + resource "aws_instance" "example" {
      + ami                                  = "ami-0b6937ac543fe96d7"
      + arn                                  = (known after apply)
      + associate_public_ip_address          = (known after apply)
      + availability_zone                    = (known after apply)
      + cpu_core_count                       = (known after apply)
      + cpu_threads_per_core                 = (known after apply)
      + disable_api_stop                     = (known after apply)
      + disable_api_termination              = (known after apply)
      + ebs_optimized                        = (known after apply)
      + get_password_data                    = false
      + host_id                              = (known after apply)
      + host_resource_group_arn              = (known after apply)
      + id                                   = (known after apply)
      + instance_initiated_shutdown_behavior = (known after apply)
      + instance_state                       = (known after apply)
      + instance_type                        = "t2.micro"
      + ipv6_address_count                   = (known after apply)
...

Plan: 1 to add, 0 to change, 0 to destroy.
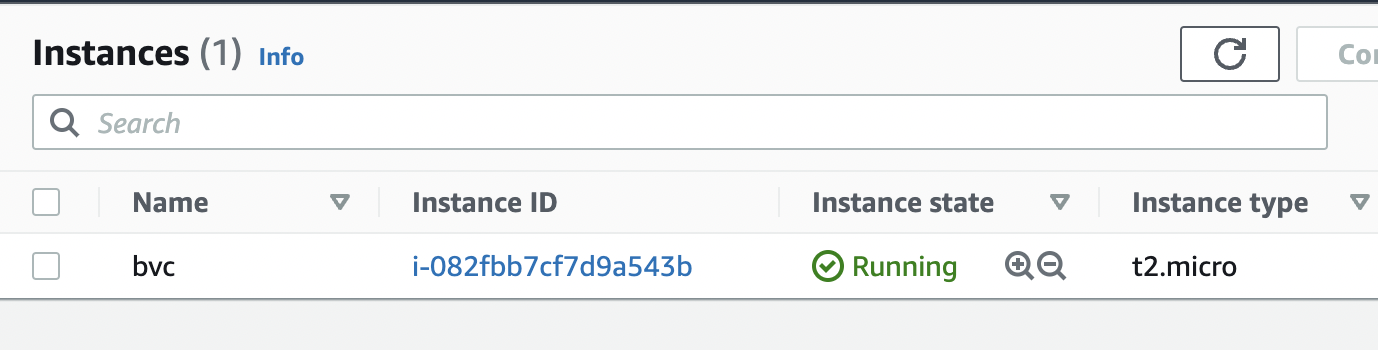
Once we're ok with the changes, we can apply them using terraform apply. This command will prompt you for one last time. In case you want to skip this prompt, run terraform apply --auto-approve.
After about 30 seconds, the instance is up and running.
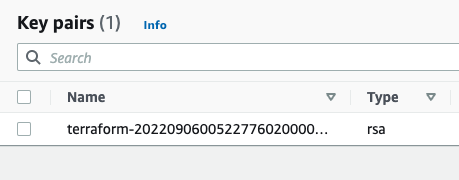
Next, we want to creat an AWS key pair so that we can SSH into the instance:
resource "tls_private_key" "key" {
  algorithm = "RSA"
  rsa_bits  = 4096

  provisioner "local-exec" {
    interpreter = ["bash", "-c"]
    command     = "echo '${self.private_key_pem}' > ${pathexpand("~/Downloads/canada.pem")}"
  }
}
The local-exec provisioner enables us to run a custom script on the machine that runs the Terraform code (in this case, our own machine). The script makes sure that we store the private key somewhere on our local file system so we can log in to the instance.
We need to also associate the key with the instance we create earlier:
resource "aws_instance" "example" {
  ami                    = "ami-0b6937ac543fe96d7"
  instance_type          = "t2.micro"
  key_name               = aws_key_pair.key_pair.key_name
}
After applying the changes, the key is created, yet we can't still SSH into the instance. The reason is that there's currently no security group attached to the instance that opens the SSH port for us. Let's add one:
data "aws_vpc" "default" {
  default = true
}

resource "aws_security_group" "allow_ssh_http" {
  name        = "allow_ssh_http"
  description = "Allows SSH and HTTP"
  vpc_id      = data.aws_vpc.default.id

  ingress {
    description = "SSH"
    from_port   = 22
    to_port     = 22
    protocol    = "tcp"
    cidr_blocks = ["0.0.0.0/0"]
  }

  ingress {
    description = "Allows HTTP"
    from_port   = 80
    to_port     = 80
    protocol    = "tcp"
    cidr_blocks = ["0.0.0.0/0"]
  }

  egress {
    from_port   = 0
    to_port     = 0
    protocol    = "-1"
    cidr_blocks = ["0.0.0.0/0"]
  }

  tags = {
    Name = "allow_ssh"
  }
}
The security group allows both SSH and HTTP (later we're installing a web server on the instance, so it's necessary to have HTTP as well).
As security groups belong to a VPC on AWS, we also need to grab the id of the default VPC that AWS creates for us in each region. The data block in Terraform enables us to do that. Note that the information we can get from a provider (in this case, AWS) depends on the provider itself and can be different from one provider to another. Don't forget to associate the security group with your instance:
resource "aws_instance" "example" {
  ami                    = "ami-0b6937ac543fe96d7"
  instance_type          = "t2.micro"
  key_name               = aws_key_pair.key_pair.key_name
  vpc_security_group_ids = [aws_security_group.allow_ssh_http.id]
  ...
}
After SSHing to the instance, we can now install an Apache web server:
sudo apt update
sudo apt install apache2
sudo systemctl start apache2
sudo systemctl enable apache2
Apache should now be running on the port 80 of the instance. In order to see the default Apache page, we would need the public IP of the instance. Although you can get that from the AWS console, let's output that using Terraform:
output "public_ip" {
  value = aws_instance.example.public_ip
}
You can now apply the changes and see the public IP address of the instance printed out in the console. Head to the IP address and you should be able to see the default Apache page.
Terraform Backend
Using a Terraform Backend
terraform {
  backend "s3" {
    bucket = "bvc-terraform-state"
    key    = "live/main.tfstate"
    region = "ca-central-1"

    dynamodb_table = "terraform-locks"
    encrypt        = true
  }
  required_providers {
    aws = {
      version = ">= 4.0.0"
      source  = "hashicorp/aws"
    }
  }
}
Create IAM Role for GitHub Actions
main.tf
# Create an IAM OIDC identity provider that trusts GitHub
resource "aws_iam_openid_connect_provider" "github_actions" {
  url            = "https://token.actions.githubusercontent.com"
  client_id_list = ["sts.amazonaws.com"]
  thumbprint_list = [
    data.tls_certificate.github.certificates[0].sha1_fingerprint
  ]
}

# Fetch GitHub's OIDC thumbprint
data "tls_certificate" "github" {
  url = "https://token.actions.githubusercontent.com"
}

# Create role for the action
data "aws_iam_policy_document" "assume_role" {
  statement {
    actions = ["sts:AssumeRoleWithWebIdentity"]
    effect  = "Allow"

    principals {
      identifiers = [aws_iam_openid_connect_provider.github_actions.arn]
      type        = "Federated"
    }

    condition {
      test     = "StringLike"
      variable = "token.actions.githubusercontent.com:sub"
      # The repos and branches defined in var.allowed_repos_branches
      # will be able to assume this IAM role
      values = [
        "repo:masoudkarimif/*:*"
      ]
    }
  }
}

# Assign policy to the role
resource "aws_iam_role" "github_actions_role" {
  name_prefix        = var.role_name_prefix
  assume_role_policy = data.aws_iam_policy_document.assume_role.json
}

resource "aws_iam_role_policy" "this" {
  role   = aws_iam_role.github_actions_role.name
  policy = <<POLICY
{
    "Version": "2012-10-17",
    "Statement": [
        {
            "Action": [
                "s3:PutObject",
                "s3:Get*"
            ],
            "Resource": "arn:aws:s3:::${var.devops_bucket_name}/*",
            "Effect": "Allow"
        },
        {
            "Action": [
                "lambda:UpdateFunctionCode"
            ],
            "Resource": "*",
            "Effect": "Allow"
        }
    ]
}
  POLICY
}

data "aws_iam_policy" "readonlyaccess" {
  arn = "arn:aws:iam::aws:policy/ReadOnlyAccess"
}

resource "aws_iam_role_policy_attachment" "attachment" {
  role       = aws_iam_role.github_actions_role.name
  policy_arn = data.aws_iam_policy.readonlyaccess.arn
}
variables.tf
variable "role_name_prefix" {
  type = string
}

variable "devops_bucket_name" {
  type = string
}
outputs.tf
output "role_name" {
  value = aws_iam_role.github_actions_role.name
}

output "role_arn" {
  value = aws_iam_role.github_actions_role.arn
}
Using Different Roles for Different Environments
In GitHub workflow:
# other stuff ...
name: deploy
# ...
      - name: Configuration for master branch
        if: ${{ github.ref == 'refs/heads/master' }}
        run: |
          echo "ROLE_ARN=${{ secrets.PROD_DEVOPS_ROLE }}" >> $GITHUB_ENV
          echo "DEVOPS_BUCKET=PROD-BUCKET" >> $GITHUB_ENV
          echo "ENV=PROD" >> $GITHUB_ENV

      - name: Configuration for stage branch
        if: ${{ github.ref == 'refs/heads/stage' }}
        run: |
          echo "ROLE_ARN=${{ secrets.STAGE_DEVOPS_ROLE }}" >> $GITHUB_ENV
          echo "DEVOPS_BUCKET=STAGE-BUCKET" >> $GITHUB_ENV
          echo "ENV=STAGE" >> $GITHUB_ENV

      - name: AWS
        uses: aws-actions/configure-aws-credentials@master
        with:
          role-to-assume: ${{ env.ROLE_ARN }}
          role-session-name: samplerolesession
          aws-region: us-east-1

# other stuff ...
Event-based Architecture
Trigger Lambda with EventBridge
resource "aws_lambda_function" "check_foo" {
    ...
}

resource "aws_cloudwatch_event_rule" "every_five_minutes" {
    name = "every-five-minutes"
    description = "Fires every five minutes"
    schedule_expression = "rate(5 minutes)"
}

resource "aws_cloudwatch_event_target" "check_foo_every_five_minutes" {
    rule = aws_cloudwatch_event_rule.every_five_minutes.name
    target_id = "some_id"
    arn = aws_lambda_function.check_foo.arn
}

resource "aws_lambda_permission" "allow_cloudwatch_to_call_check_foo" {
    statement_id = "AllowExecutionFromCloudWatch"
    action = "lambda:InvokeFunction"
    function_name = aws_lambda_function.check_foo.function_name
    principal = "events.amazonaws.com"
    source_arn = aws_cloudwatch_event_rule.every_five_minutes.arn
}
Read CSV files with Python
with open("file.csv", mode="r", encoding="utf-8", errors="ignore") as file:
  csv_reader = csv.reader(file, delimiter=",")
  for row in csv_reader:
    print(row)
Create S3 Bucket Notification w/ Lambda as Target
resource "aws_s3_bucket_notification" "bucket_notification" {
  bucket = aws_s3_bucket.name.id

  lambda_function {
    lambda_function_arn = aws_lambda_function.lambda_func.arn
    events              = ["s3:ObjectCreated:*"]
    filter_suffix       = ".csv"
  }
}

resource "aws_lambda_permission" "allow_bucket" {
  statement_id  = "AllowExecutionFromS3Bucket"
  action        = "lambda:InvokeFunction"
  function_name = aws_lambda_function.lambda_func.arn
  principal     = "s3.amazonaws.com"
  source_arn    = aws_s3_bucket.name.arn
}

resource "aws_lambda_function_event_invoke_config" "invoke_config" {
  function_name          = aws_lambda_function.lambda_func.function_name
  maximum_retry_attempts = 0

  depends_on = [
    aws_lambda_permission.allow_bucket
  ]
}
Batch Jobs
Create a Batch Job with EventBridge Trigger
# get default vpc
data "aws_vpc" "default" {
  default = true
}

# get all the subnets
data "aws_subnets" "all" {
  filter {
    name   = "vpc-id"
    values = [data.aws_vpc.default.id]
  }
}

# role that the instance could assume
resource "aws_iam_role" "ecs_instance_role" {
  name               = "ecs_instance_role"
  assume_role_policy = <<EOF
{
    "Version": "2012-10-17",
    "Statement": [
    {
        "Action": "sts:AssumeRole",
        "Effect": "Allow",
        "Principal": {
            "Service": "ec2.amazonaws.com"
        }
    }
    ]
}
EOF
}

# attach a managed policy to the role
resource "aws_iam_role_policy_attachment" "ecs_instance_role" {
  role       = aws_iam_role.ecs_instance_role.name
  policy_arn = "arn:aws:iam::aws:policy/service-role/AmazonEC2ContainerServiceforEC2Role"
}

# create an instance profile from the role
resource "aws_iam_instance_profile" "ecs_instance_role" {
  name = "ecs_instance_role"
  role = aws_iam_role.ecs_instance_role.name
}

# create role for the batch service to assume
resource "aws_iam_role" "aws_batch_service_role" {
  name = "aws_batch_service_role"

  assume_role_policy = <<EOF
{
    "Version": "2012-10-17",
    "Statement": [
    {
        "Action": "sts:AssumeRole",
        "Effect": "Allow",
        "Principal": {
        "Service": "batch.amazonaws.com"
        }
    }
    ]
}
EOF
}

# attach a managed policy to the batch role
resource "aws_iam_role_policy_attachment" "aws_batch_service_role" {
  role       = aws_iam_role.aws_batch_service_role.name
  policy_arn = "arn:aws:iam::aws:policy/service-role/AWSBatchServiceRole"
}

# ec2 instances need to have a security group
resource "aws_security_group" "sg" {
  name = "aws_batch_compute_environment_security_group"

  #   open up egress
  egress {
    from_port   = 0
    to_port     = 0
    protocol    = "-1"
    cidr_blocks = ["0.0.0.0/0"]
  }
}

# create batch compute environment
resource "aws_batch_compute_environment" "ce" {
  compute_environment_name = "batch-ce"

  compute_resources {
    instance_role  = aws_iam_instance_profile.ecs_instance_role.arn
    subnets        = data.aws_subnets.all.ids
    instance_type  = ["optimal"]
    max_vcpus      = 3
    min_vcpus      = 0
    bid_percentage = 100

    security_group_ids = [
      aws_security_group.sg.id,
    ]

    type                = "SPOT"
    allocation_strategy = "BEST_FIT"
    # needs to be created first
    # check out https://docs.aws.amazon.com/batch/latest/userguide/spot_fleet_IAM_role.html
    spot_iam_fleet_role = "arn:aws:iam::690521436457:role/AmazonEC2SpotFleetTaggingRole"
  }


  type         = "MANAGED"
  service_role = aws_iam_role.aws_batch_service_role.arn
  depends_on   = [aws_iam_role_policy_attachment.aws_batch_service_role]
}

# create batch job definition
resource "aws_batch_job_definition" "jd" {
  name = "batch-jd"
  type = "container"

  container_properties = <<CONTAINER_PROPERTIES
{
    "image": "${aws_ecr_repository.my_awesome_repo.repository_url}:latest",
    "resourceRequirements": [
    {"type": "VCPU", "value": "1"},
    {"type": "MEMORY", "value": "1024"}
  ]
}
CONTAINER_PROPERTIES
}

# create ecr repo to push docker image too
resource "aws_ecr_repository" "repo" {
  name = "my-awesome-repo"
}

# create batch job queue
resource "aws_batch_job_queue" "queue" {
  name     = "job-queue"
  state    = "ENABLED"
  priority = 1
  compute_environments = [
    aws_batch_compute_environment.ce.arn,
  ]
}

# create event rule to run the batch job
resource "aws_cloudwatch_event_rule" "sample" {
  name                = "sample"
  description         = "Sample Batch Job"
  schedule_expression = "rate(10 minutes)"
}

# create target for the event rule
resource "aws_cloudwatch_event_target" "target" {
  rule      = aws_cloudwatch_event_rule.sample.name
  target_id = "to-batch"
  arn       = aws_batch_job_queue.queue.arn
  role_arn  = aws_iam_role.eb_role.arn
  batch_target {
    job_definition = aws_batch_job_definition.jd.arn
    job_name       = "schedule"
    job_attempts   = 1
  }

  depends_on = [
    aws_iam_role_policy_attachment.eb_attachment
  ]
}

# create role for eventbridge to assume
resource "aws_iam_role" "eb_role" {
  name = "eb_role"

  assume_role_policy = <<EOF
{
  "Version": "2012-10-17",
  "Statement": [
    {
      "Sid": "",
      "Effect": "Allow",
      "Principal": {
        "Service": "events.amazonaws.com"
      },
      "Action": "sts:AssumeRole"
    }
  ]
}
EOF
}

# create policy for event eventbridge role
resource "aws_iam_policy" "policy" {
  name        = "eb_policy"
  description = "eb_policy"

  policy = jsonencode({
    Version = "2012-10-17"
    Statement = [
      {
        Action = [
          "batch:SubmitJob",
        ]
        Effect   = "Allow"
        Resource = "*"
      },
    ]
  })
}

# attach policy to role
resource "aws_iam_role_policy_attachment" "eb_attachment" {
  role       = aws_iam_role.eb_role.name
  policy_arn = aws_iam_policy.policy.arn
}
Getting Started with Kubernetes
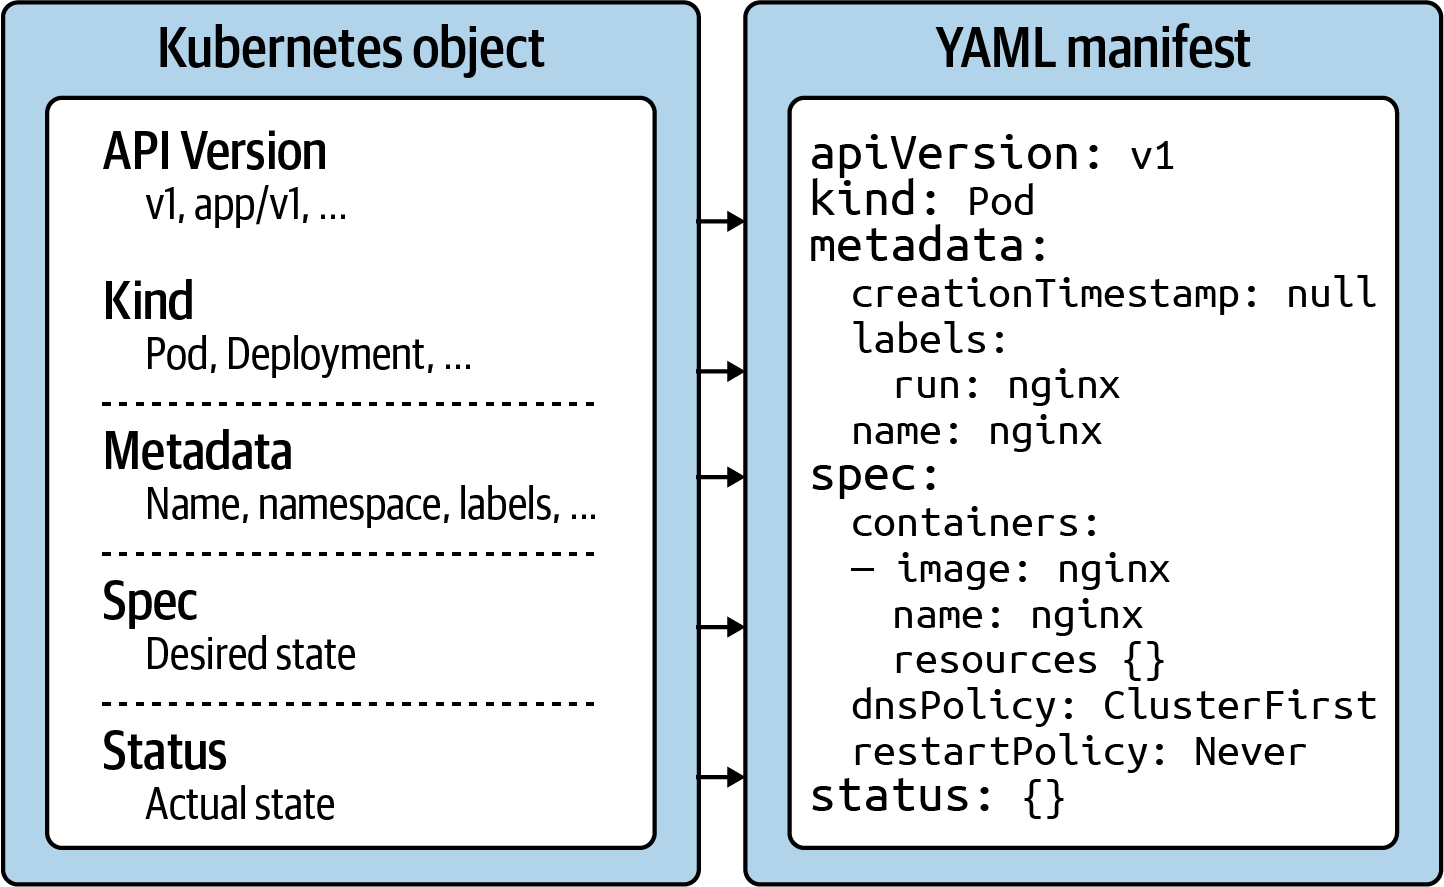
Kubernetes object structure
API version
The Kubernetes API version defines the structure of a primitive and uses it to validate the correctness of the data. The API version serves a similar purpose as XML schemas to a XML document or JSON schemas to a JSON document. The version usually undergoes a maturity process—e.g., from alpha to beta to final. Sometimes you see different prefixes separated by a slash (e.g., apps). You can list the API versions compatible with your cluster version by running the command kubectl api-versions.
Kind
The kind defines the type of primitive—e.g., a Pod or a Service. It ultimately answers the question, “What type of object are we dealing with here?”
Metadata
Metadata describes higher-level information about the object—e.g., its name, what namespace it lives in, or whether it defines labels and annotations. This section also defines the UID.
Spec
The specification (“spec” for short) declares the desired state—e.g., how should this object look after it has been created? Which image should run in the container, or which environment variables should be set for?
Status
The status describes the actual state of an object. The Kubernetes controllers and their reconcilliation loops constantly try to transition a Kubernetes object from the desired state into the actual state. The object has not yet been materialized if the YAML status shows the value {}.
Using kubectl to Interact with the Kubernetes Cluster
kubectl is the primary tool to interact with the Kubernetes clusters from the command line. The CKAD exam is exclusively focused on the use of kubectl. Therefore, it’s paramount to understand its ins and outs and practice its use heavily.
In this section, I want to provide you with a brief overview of its typical usage pattern. Let’s start by looking at the syntax for running commands first. A kubectl execution consists of a command, a resource type, a resource name, and optional command line flags:
kubectl [command] [TYPE] [NAME] [flags]
The command specifies the operation you’re planning to run. Typical commands are verbs like create, get, describe, or delete. Next, you’ll need to provide the resource type you’re working on, either as a full resource type or its short form. For example, you could work on a service here, or use the short form, svc. The name of the resource identifies the user-facing object identifier, effectively the value of metadata.name in the YAML representation. Be aware that the object name is not the same as the UID. The UID is an autogenerated, Kubernetes-internal object reference that you usually don’t have to interact with. The name of an object has to be unique across all objects of the same resource type within a namespace. Finally, you can provide zero to many command line flags to describe additional configuration behavior. A typical example of a command-line flag is the --port flag, which exposes a Pod’s container port.
Imperative Approach
The imperative method for object creation does not require a manifest definition. You would use the kubectl run or kubectl create command to create an object on the fly. Any configuration needed at runtime is provided by command-line options. The benefit of this approach is the fast turnaround time without the need to wrestle with YAML structures:
kubectl run frontend --image=nginx --restart=Never --port=80
Declarative Approach
The declarative approach creates objects from a manifest file (in most cases, a YAML file) using the kubectl create or kubectl apply command. The benefit of using the declarative method is reproducibility and improved maintenance, as the file is checked into version control in most cases. The declarative approach is the recommended way to create objects in production environments:
kubectl create -f pod.yaml
Hybrid Approach
Sometimes, you may want to go with a hybrid approach. You can start by using the imperative method to produce a manifest file without actually creating an object. You do so by executing the kubectl run command with the command-line options -o yaml and --dry-run=client:
kubectl run frontend --image=nginx --restart=Never --port=80 -o yaml --dry-run=client > pod.yaml
Deleting an object
At any given time, you can delete a Kubernetes object. During the exam, the need may arise if you made a mistake while solving a problem and want to start from scratch to ensure a clean slate. In a work environment, you’ll want to delete objects that are not needed anymore. The delete command offers two options: deleting an object by providing the name or deleting an object by pointing to the YAML manifest that created it:
kubectl delete pod frontend
# pod "frontend" deleted
kubectl delete -f pod.yaml
Updating a live object
Finally, I want to briefly explain the apply command and the main difference to the create command. The create command instantiates a new object. Trying to execute the create command for an existing object will produce an error. The apply command is meant to update an existing object in its entirety or just incrementally. That’s why the provided YAML manifest may be a full definition of an object or a partial definition (e.g., just the number of replicas for a Deployment). Please note that the apply command behaves like the create command if the object doesn’t exist yet, however, the YAML manifest will need to contain a full definition of the object
Kubernetes Pods & Namespaces
Creating a Pod
apiVersion: v1
kind: Pod
metadata:
  name: hazelcast
  labels:
    app: hazelcast
    env: prod
spec:
  containers:
  - env:
    - name: DNS_DOMAIN
      value: cluster
    image: hazelcast/hazelcast
    name: hazelcast
    ports:
    - containerPort: 5701
  restartPolicy: Never
kubectl create -f pod.yaml

# list pods
kubectl get pods

# get pod
kubectl get pods hazelcast

# rendering pod details
kubectl describe pods hazelcast

# accessing logs of a pod
kubectl logs hazelcast

# executin command in a container
kubectl exec -it hazelcast -- /bin/sh
kubectl exec hazelcast -- env
Defining a Command for a Pod
apiVersion: v1
kind: Pod
metadata:
  name: mypod
spec:
  containers:
  - args:
    - /bin/sh
    - -c
    - while true; do date; sleep 10; done
    image: busybox
    name: mypod
  restartPolicy: Never
Same result with:
apiVersion: v1
kind: Pod
metadata:
  name: mypod
spec:
  containers:
  - command: ["/bin/sh"]
    args: ["-c", "while true; do date; sleep 10; done"]
    image: busybox
    name: mypod
  restartPolicy: Never
Understanding Namespaces
Namespaces are an API construct to avoid naming collisions and represent a scope for object names. A good use case for namespaces is to isolate the objects by team or responsibility. Most questions in the CKAD exam will ask you to execute the command in a specific namespace which has been set up for you. The following sections briefly touch on the basic operations needed to deal with a namespace.
The default namespace hosts object that haven’t been assigned to an explicit namespace. Namespaces starting with the prefix kube- are not considered end user-namespaces. They have been created by the Kubernetes system. You will not have to interact with them as an application developer.
Listing namespaces:
kubectl get namespaces
Creating and Using a Namespace
To create a new namespace, use the create namespace command. The following command uses the name code-red:
kubectl create namespace code-red
kubectl get namespace code-red
The corresponding representation as a YAML manifest would look as follows:
apiVersion: v1
kind: Namespace
metadata:
  name: code-red
Once the namespace is in place, you can create objects within it. You can do so with the command line option --namespace or its short-form -n. The following commands create a new Pod in the namespace code-red and then lists the available Pods in the namespace
kubectl run pod --image=nginx --restart=Never -n code-red
kubectl get pods -n code-red
Deleting a Namespace
Deleting a namespace has a cascading effect on the object existing in it. Deleting a namespace will automatically delete its objects:
kubectl delete namespace code-red
kubectl get pods -n code-red
Kubernetes Configs
Creating a ConfigMap
You can create a ConfigMap imperatively with a single command: kubectl create configmap. As part of the command, you have to provide a mandatory command-line flag that points to the source of the data. Kubernetes distinguishes four different options:
- Literal values, which are key-value pairs as plain text.
- A file that contains key-value pairs and expects them to be environment variables.
- A file with arbitrary contents.
- A directory with one or many files.
The following commands show all options in action. You will find that a file and directory use the same command-line option, --from-file. Later, we’ll revisit how those key-value pairs are parsed and stored in a ConfigMap.
Literal values
kubectl create configmap db-config --from-literal=db=staging
Single file with environment variables
configmap/db-config created
ConfigMap YAML file manifest:
apiVersion: v1
kind: ConfigMap
metadata:
  name: backend-config
data:
  database_url: jdbc:postgresql://localhost/test
  user: fred
Consuming a ConfigMap as Environment Variables
apiVersion: v1
kind: Pod
metadata:
  name: configured-pod
spec:
  containers:
  - image: nginx:1.19.0
    name: app
    envFrom:
    - configMapRef:
        name: backend-config
Sometimes, key-value pairs do not conform to typical naming conventions for environment variables or can’t be changed without impacting running services. You can redefine the keys used to inject an environment variable into a Pod with the valueFrom attribute.
apiVersion: v1
kind: Pod
metadata:
  name: configured-pod
spec:
  containers:
  - image: nginx:1.19.0
    name: app
    env:
    - name: DATABASE_URL
      valueFrom:
        configMapKeyRef:
          name: backend-config
          key: database_url
    - name: USERNAME
      valueFrom:
        configMapKeyRef:
          name: backend-config
          key: user
Mounting a ConfigMap as Volume
Most programming languages can resolve and use environment variables to control the runtime behavior of an application. Especially when dealing with a long list of configuration data, it might be preferable to access the key-value pairs from the filesystem of the container.
apiVersion: v1
kind: Pod
metadata:
  name: configured-pod
spec:
  containers:
  - image: nginx:1.19.0
    name: app
    volumeMounts:
    - name: config-volume
      mountPath: /etc/config
  volumes:
  - name: config-volume
    configMap:
      name: backend-config
Creating a Secret
You can create a Secret imperatively with a single command: kubectl create secret. Similar to the command for creating a ConfigMap, you will have to provide an additional subcommand and a configuration option. It’s mandatory to spell out the subcommand right after the Kubernetes resource type secret.
In most cases, you will likely deal with the type generic, which provides the same command-line options to point to the source of the configuration data as kubectl create configmap:
- Literal values, which are key-value pairs as plain text.
- A file that contains key-value pairs and expects them to be environment variables.
- A file with arbitrary contents.
- A directory with one or many files.
kubectl create secret generic db-creds --from-literal=pwd=s3cre!
Of course, you can always take the declarative route, but there’s a little catch. You have to Base64-encode the configuration data value yourself when using the type Opaque. How can you do so? One way to encode and decode a value is the Unix command-line tool base64.
Declarative way:
apiVersion: v1
kind: Secret
metadata:
  name: db-creds
type: Opaque
data:
  pwd: czNjcmUh
Consuming a Secret as Environment Variables
Consuming the key-value pairs of a Secret as environment variables from a container works almost exactly the same way as it does for a ConfigMap. There’s only one difference: instead of using envFrom.configMapRef, you’d use envFrom.secretRef:
apiVersion: v1
kind: Pod
metadata:
  name: configured-pod
spec:
  containers:
  - image: nginx:1.19.0
    name: app
    envFrom:
    - secretRef:
        name: db-creds
It’s important to understand that the container will make the environment variable available in a Base64-decoded value. In turn, your application running in the container will not have to implement Base64-decoding logic.
Creating a ResourceQuota
The Kubernetes primitive ResourceQuota establishes the usable, maximum amount of resources per namespace. Once put in place, the Kubernetes scheduler will take care of enforcing those rules.
Creating a ResourceQuota object is usually a task a Kubernetes administrator would take on, but it’s relatively easy to define and create such an object. First, create the namespace the quota should apply to:
kubectl create namespace team-awesome
kubectl get namespace
apiVersion: v1
kind: ResourceQuota
metadata:
  name: awesome-quota
spec:
  hard:
    pods: 2
    requests.cpu: "1"
    requests.memory: 1024m
    limits.cpu: "4"
    limits.memory: 4096m
kubectl create -f awesome-quota.yaml --namespace=team-awesome
kubectl describe resourcequota awesome-quota --namespace=team-awesome
Test Pod Manifest:
apiVersion: v1
kind: Pod
metadata:
  name: nginx
spec:
  containers:
  - image: nginx:1.18.0
    name: nginx
    resources:
      requests:
        cpu: "0.5"
        memory: "512m"
      limits:
        cpu: "1"
        memory: "1024m"
Kubernetes Labels & Deployments
Understanding Labels
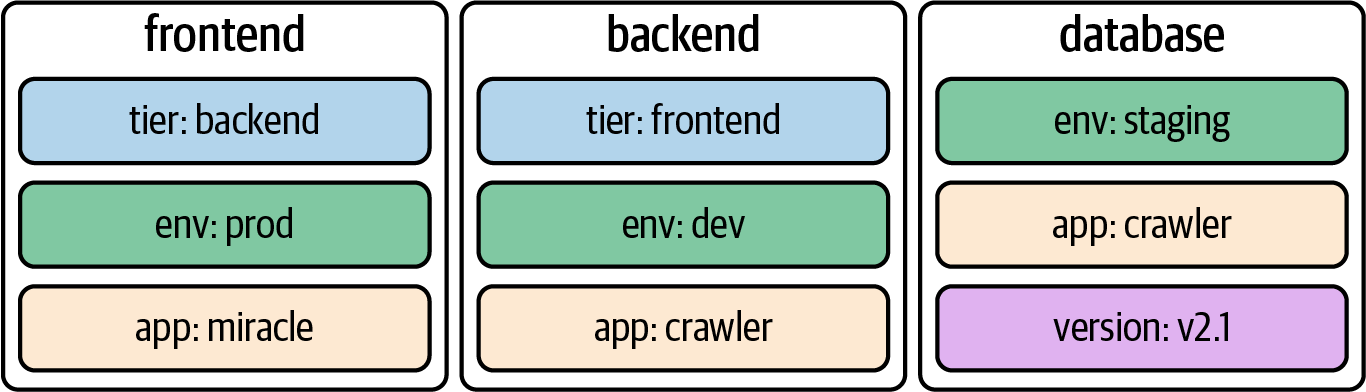
Kubernetes lets you assign key-value pairs to objects so that you can use them later within a search query. Those key-value pairs are called labels. To draw an analogy, you can think of labels as tags for a blog post. A label describes a Kubernetes object in distinct terms (e.g., a category like “frontend” or “backend”) but is not meant for elaborate, multi-word descriptions of its functionality. As part of the specification, Kubernetes limits the length of a label to a maximum of 63 characters and a range of allowed alphanumeric and separator characters.
It’s common practice to assign one or many labels to an object at creation time; however, you can modify them as needed for a live object. When confronted with labels for the first time, they might seem like an insignificant feature—but their importance cannot be overstated. They’re essential for understanding the runtime behavior of more advanced Kubernetes objects like a Deployment and a Service.
Declaring Labels
Labels can be declared imperatively with the run command or declaratively in the metadata.labels section in the YAML manifest. The command-line option --labels (or -l in its short form) defines a comma-separated list of labels when creating a Pod. The following command creates a new Pod with two labels from the command line:
kubectl run labeled-pod --image=nginx --restart=Never --labels=tier=backend,env=dev
Assigning labels to Kubernetes objects by editing the manifest requires a change to the metadata section.
apiVersion: v1
kind: Pod
metadata:
  name: labeled-pod
  labels:
    env: dev
    tier: backend
spec:
  containers:
  - image: nginx
    name: nginx
Inspecting Labels
You can inspect the labels assigned to a Kubernetes object from different angles. Here, we’ll want to look at the most common ways to identify the labels of a Pod. As with any other runtime information, you can use the describe or get commands to retrieve the labels:
kubectl describe pod labeled-pod | grep -C 2 Labels:
kubectl get pod labeled-pod -o yaml | grep -C 1 labels:
If you want to list the labels for all object types or a specific object type, use the --show-labels command-line option. This option is convenient if you need to sift through a longer list of objects. The output automatically adds a new column named LABELS:
kubectl get pods --show-labels
NAME          READY   STATUS    RESTARTS   AGE   LABELS
labeled-pod   1/1     Running   0          38m   env=dev,tier=backend
Understanding Deployments
At the beginning, we discussed labels and label selection from all angles. We did so for a good reason. A Deployment is one of the Kubernetes primitives that uses labels as a foundational concept. If you didn’t have a chance to fully brush up on labels, I’d urge you to review the content.
Running an application inside of a Pod is powerful, but scalability and reliability can become a problem. Say the load on your application increases during peak times or because of a growing user base, and you still have only one Pod instance that can serve up the application’s functionality. With increased traffic comes higher resource consumption. Depending on the resource requirements of the container, the application may come to a grinding halt.
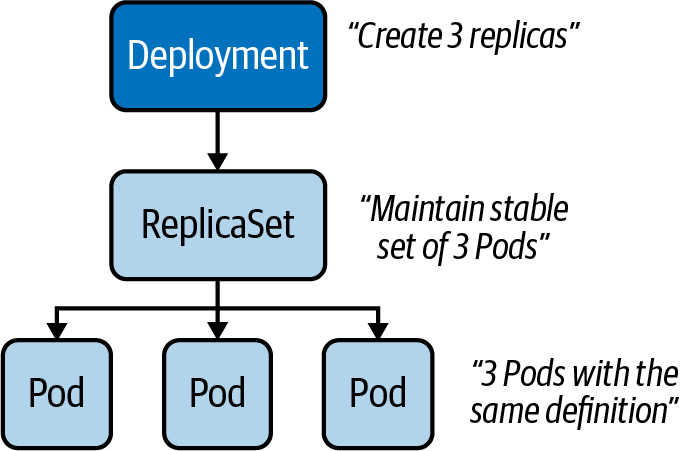
That’s where a Deployment comes in. Within a Deployment, you can specify the number of Pods running your application with the exact same setup. Need to scale up? Simply bump up the number of replicas, and Kubernetes will take care of creating the Pods. Furthermore, the Deployment ensures that failing Pods are restarted so that the actual state matches with the desired state. Under the hood, a Deployment uses the Kubernetes primitive ReplicaSet, as shown below.
The ReplicaSet’s sole purpose is to replicate a guaranteed number of Pods with the same configuration.
Creating Deployments
Deployments can be created imperatively with the create deployment command. The options you can provide to configure the Deployment are somewhat limited and do not resemble the ones you know from the run command. The following command creates a new Deployment that uses the image nginx:1.14.2 for a single replica:
kubectl create deployment my-deploy --image=nginx:1.14.2
Often, you will find yourself generating and further modifying the YAML manifest. The following manifest creates a Deployment with a single replica. If you look closely, you will see label selection in action. The selector spec.selector.matchLabels matches on the key-value pair app=my-deploy with the label defined under the template section, as shown below:
apiVersion: apps/v1
kind: Deployment
metadata:
  name: my-deploy
  labels:
    app: my-deploy
spec:
  replicas: 1
  selector:
    matchLabels:
      app: my-deploy
  template:
    metadata:
      labels:
        app: my-deploy
    spec:
      containers:
      - name: nginx
        image: nginx:1.14.2
Listing Deployments
Once created, a Deployment and all of its corresponding objects can be listed. The following get command lists all Deployments, Pods, and ReplicaSets. If a Pod or ReplicaSet is managed by a Deployment, the name of the object will reflect that connection. For the Deployment named my-deploy, you will find at least one Pod and one ReplicaSet with the prefix my-deploy- plus a random hash:
kubectl get deployments,pods,replicasets
Rendering Deployment Details
You can inspect the details of a Deployment using the describe command. Not only does the output provide information on the number and availability of replicas, it also presents you with the reference to the ReplicaSet. Inspecting the ReplicaSet or the replicated Pods renders references to the parent object managing it:
kubectl describe deployment.apps/my-deploy
kubectl describe replicaset.apps/my-deploy-8448c488b5
kubectl describe pod/my-deploy-8448c488b5-mzx5g
Rolling Out a New Revision
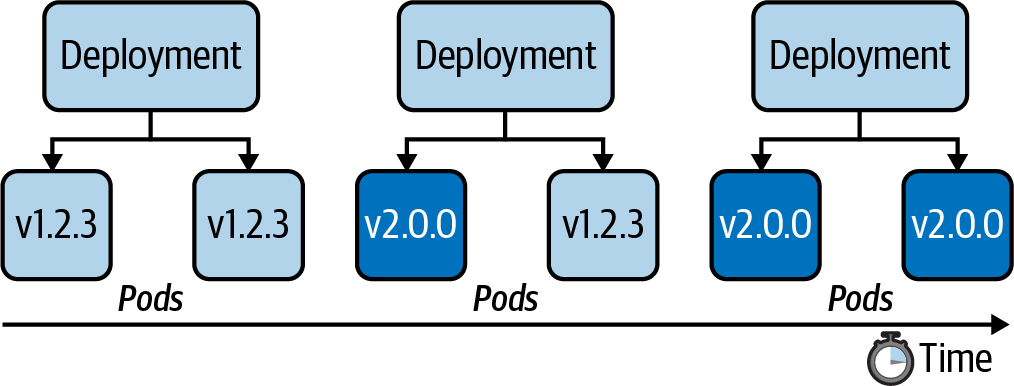
Application development is usually not stagnant. As part of the software development lifecycle, you build a new feature or create a bug fix and deploy the changes to the Kubernetes cluster as part of the release process. In practice, you’d push a new Docker image to the registry bundling the changes so that they can be run in a container. By default, a Deployment rolls out a new container image using a zero-downtime strategy by updating Pods one by one. The following figure shows the rolling update process for a Deployment controlling two replicas from version 1.2.3 to 2.0.0.
Every Deployment keeps a record of the rollout history. Within the history, a new version of a rollout is called a revision. Before experiencing the rollout of a new revision in practice, let’s inspect the initial state of the Deployment named my-deploy. The rollout command shows revision 1, which represents the creation of the Deployment with all its settings:
# should show only one revision
kubectl rollout history deployment my-deploy
In the next step, we will update the container image used on the Deployment from nginx:1.14.2 to nginx:1.19.2. To do so, either edit the live object or run the set image command:
kubectl set image deployment my-deploy nginx=nginx:1.19.2
Looking at the rollout history again now shows revision 1 and 2. When changing the Pod template of a Deployment—for example, by updating the image—a new ReplicaSet is created. The Deployment will gradually migrate the Pods from the old ReplicaSet to the new one. Inspecting the Deployment details reveals a different name—in this case, my-deploy-775ccfcbc8:
$ kubectl rollout history deployment my-deploy
deployment.apps/my-deploy
REVISION  CHANGE-CAUSE
1         <none>
2         <none>
$ kubectl describe deployment.apps/my-deploy
...
NewReplicaSet:   my-deploy-775ccfcbc8 (1/1 replicas created)
...
$ kubectl rollout status deployment my-deploy
deployment "my-deploy" successfully rolled out
NOTE
By default, a Deployment persists a maximum of 10 revisions in its history. You can change the limit by assigning a different value to spec.revisionHistoryLimit.
You can also retrieve detailed information about a revision with the rollout history command by providing the revision number using the --revision command-line option. The details of a revision can give you an indication of what exactly changed between revisions:
$ kubectl rollout history deployments my-deploy --revision=2
deployment.apps/my-deploy with revision #2
Pod Template:
  Labels:	app=my-deploy
	pod-template-hash=9df7d9c6
  Containers:
   nginx:
    Image:	nginx:1.19.2
    Port:	<none>
    Host Port:	<none>
    Environment:	<none>
    Mounts:	<none>
  Volumes:	<none>
The rolling update strategy ensures that the application is always available to end users. This approach implies that two versions of the same application are available during the update process. As an application developer, you have to be aware that convenience doesn’t come without potential side effects. If you happen to introduce a breaking change to the public API of your application, you might temporarily break consumers, as they could hit revision 1 or 2 of the application. You can change the default update strategy of a Deployment by providing a different value to the attribute strategy.type; however, consider the trade-offs. For example, the value Recreate kills all Pods first, then creates new Pods with the latest revision, causing a potential downtime for consumers.
Rolling Back to a Previous Revision
Despite the best efforts to avoid them by writing extensive test suites, bugs happen. Not only can the rollout command deploy a new version of an application, you can also roll back to an earlier revision. In the previous section, we rolled out revisions 1 and 2. Assume revision 2 contains a bug and we need to quickly revert to revision 1. The following command demonstrates the process:
kubectl rollout undo deployment my-deploy --to-revision=1
If you look at the rollout history, you’ll find revisions 2 and 3. Kubernetes recognizes that revisions 1 and 3 are exactly the same. For that reason, the rollout history deduplicates revision 1 effectively; revision 1 became revision 3:
kubectl rollout history deployment my-deploy
The rollback process works pretty much the same way as rolling out a new revision. Kubernetes switches back to the “old” ReplicaSet, drains the Pods with the image nginx:1.19.2, and starts new Pods with the image nginx:1.14.2.
Manually Scaling a Deployment
The scaling process is completely abstracted from the end user. You just have to tell the Deployment that you want to scale to a specified number of replicas. Kubernetes will take care of the rest.
Say we wanted to scale from one replica to five replicas, as shown below:
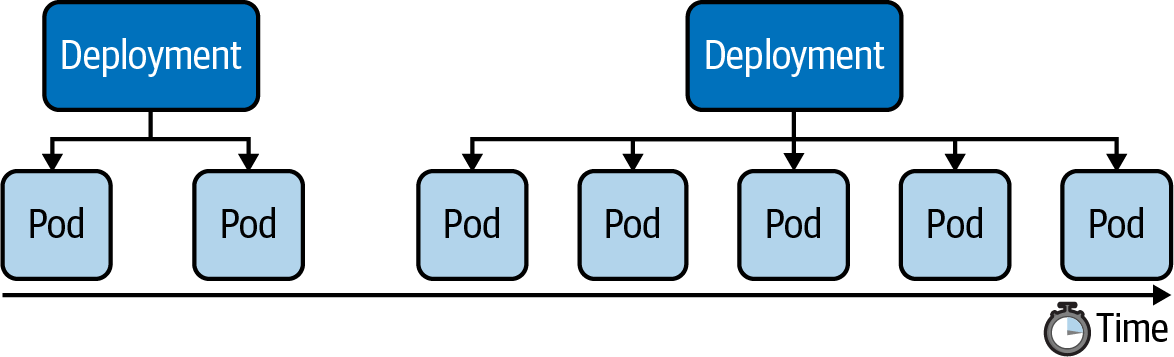
We have two options: using the scale command or changing the value of the replicas attribute for the live object. The following command show the effect of scaling up a Deployment:
kubectl scale deployment my-deploy --replicas=5
A Deployment records scaling activities in its events, which we can view using the describe deployment command:
kubectl describe deployment.apps/my-deploy
Horizontal Pod Autoscaler
The Horizontal Pod Autoscaler doesn't come pre-installed with Docker Desktop. Follow this tutorial on how to install it.
A Deployment can be autoscaled using the autoscale deployment command. Provide the name and the thresholds you’d like the autoscaler to act upon. In the following example, we’re specifying a minimum of 2 replicas at any given time, a maximum number of 8 replicas the HPA can scale up to, and the CPU utilization threshold of 70%. Listing the HPAs in the namespace reflects those numbers. You can use the primitive name horizontalpodautoscalers for the command; however, I prefer the short-form notation hpa:
kubectl autoscale deployment my-deploy --cpu-percent=70 --min=2 --max=8
The current status of the HPA shows the upper CPU threshold limit but renders <unknown> for the current CPU consumption. That’s usually the case if the metrics server is not running, is misconfigured, or if the Pod template of the Deployment doesn’t define any resource requirements. Check the events of the HPA using the command kubectl describe hpa my-deploy.
Here's the YAML manifest for an HPA:
apiVersion: autoscaling/v2
kind: HorizontalPodAutoscaler
metadata:
  name: autoscaler
spec:
  scaleTargetRef:
    apiVersion: apps/v1
    kind: Deployment
    name: nginx-deployment
  minReplicas: 1
  maxReplicas: 5
  metrics:
  - type: Resource
    resource:
      name: cpu
      target:
        type: Utilization
        averageUtilization: 50
Summary
Labels are one of the central concepts that control the runtime behavior of more advanced Kubernetes objects. For example, in the context of a Deployment, label selection is used to select the Pods the Deployment manages. You can use labels to select objects based on a query from the command line or within a manifest if supported by the primitive’s API. Annotations serve a different purpose—they are only meant for providing human-readable, informative metadata and can be used for querying objects.
The Deployment is an essential primitive for scaling an application by running it in multiple replicas. The heavy lifting of managing those replicas is performed by a ReplicaSet. Application developers do not have to interact directly with the ReplicaSet; a Deployment handles it under the hood. Deployments come with the capability to easily roll out and roll back revisions of the application represented by an image running in the container. You learned about the commands for controlling the revision history and its operations. Scaling a Deployment manually requires deep insight into the requirements and the load of an application. A Horizontal Pod Autoscaler can automatically scale the number of replicas based on CPU and memory thresholds observed at runtime.
Kubernetes Jobs
Understanding Jobs
A Pod is meant for the continuous operation of an application. You will want to deploy the application with a specific version and then keep it running without interrupts if possible.
A Job is a Kubernetes primitive with a different goal. It runs functionality until a specified number of completions has been reached, making it a good fit for one-time operations like import/export data processes or I/O-intensive processes with a finite end. The actual work managed by a Job is still running inside of a Pod. Therefore, you can think of a Job as a higher-level coordination instance for Pods executing the workload.
Upon completion of a Job and its Pods, Kubernetes does not automatically delete the objects—they will stay until they’re explicity deleted. Keeping those objects helps with debugging the command run inside of the Pod and gives you a chance to inspect the logs.
Kubernetes supports an auto-cleanup mechanism for Jobs and their controlled Pods by specifying the attribute spec.ttlSecondsAfterFinished.
apiVersion: batch/v1
kind: Job
metadata:
  name: counter
spec:
  template:
    spec:
      containers:
      - name: counter
        image: nginx
        command:
        - /bin/sh
        - -c
        - counter=0; while [ $counter -lt 3 ]; do counter=$((counter+1)); \
          echo "$counter"; sleep 3; done;
      restartPolicy: Never
Job Operation Types
The default behavior of a Job is to run the workload in a single Pod and expect one successful completion. That’s what Kubernetes calls a non-parallel Job. Internally, those parameters are tracked by the attributes spec.template.spec.completions and spec.template.spec.parallelism, each with the assigned value 1.
You can tweak any of those parameters to fit the needs of your use case. Say you’d expect the workload to complete successfully multiple times; then you’d increase the value of spec.template.spec.completions to at least 2. Sometimes, you’ll want to execute the workload by multiple pods in parallel. In those cases, you’d bump up the value assigned to spec.template.spec.parallelism. This is referred to as a parallel job.
Restart Behavior
The spec.backoffLimit attribute determines the number of retries a Job attempts to successfully complete the workload until the executed command finishes with an exit code 0. The default is 6, which means it will execute the workload 6 times before the Job is considered unsuccessful.
The Job manifest needs to explicitly declare the restart policy by using spec.template.spec.restartPolicy. The default restart policy of a Pod is Always, which tells the Kubernetes scheduler to always restart the Pod even if the container exits with a zero exit code. The restart policy of a Job can only be OnFailure or Never.
Restarting the Container on Failure
The following figure shows the behavior of a Job that uses the restart policy OnFailure. Upon a container failure, this policy will simply rerun the container.

Starting a New Pod on Failure
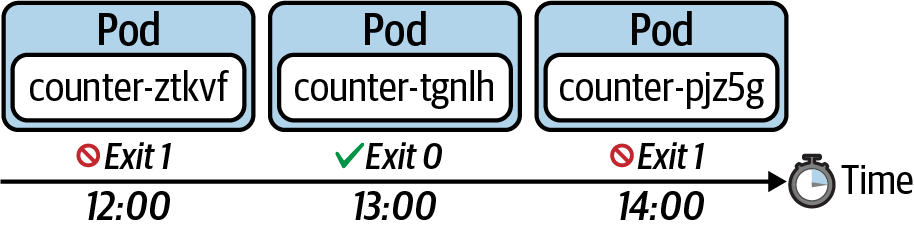
The following figure shows the behavior of a Job that uses the restart policy Never. This policy does not restart the container upon a failure. It starts a new Pod instead.

Understanding CronJobs
A Job represents a finite operation. Once the operation could be executed successfully, the work is done and the Job will create no more Pods. A CronJob is essentially a Job, but it’s run periodically based a schedule; however, it will continue to create a new Pod when it’s time to run the task. The schedule can be defined with a cron-expression you may already know from Unix cron jobs. The following figure shows a CronJob that executes every hour. For every execution, the CronJob creates a new Pod that runs the task and finishes with a zero or non-zero exit code.
Creating and Inspecting CronJobs
apiVersion: batch/v1beta1
kind: CronJob
metadata:
  name: current-date
spec:
  schedule: "* * * * *"
  jobTemplate:
    spec:
      template:
        spec:
          containers:
          - name: current-date
            image: nginx
            args:
            - /bin/sh
            - -c
            - 'echo "Current date: $(date)"'
          restartPolicy: OnFailure
If you list the existing CronJob with the get cronjobs command, you will see the schedule, the last scheduled execution, and whether the CronJob is currently active. It’s easy to match Pods managed by a CronJob. You can simply identify them by the name prefix. In this case, the prefix is current-date-:
kubectl get cronjobs
kubectl get pods
Summary
Jobs are well suited for implementing batch processes run in one or many Pods as a finite operation. Both objects, the Job and the Pod, will not be deleted after the work is completed in order to support inspection and troubleshooting activities. A CronJob is very similar to a Job, but executes on a schedule, defined as a Unix cron expression.
Kubernetes Services
Understanding Services
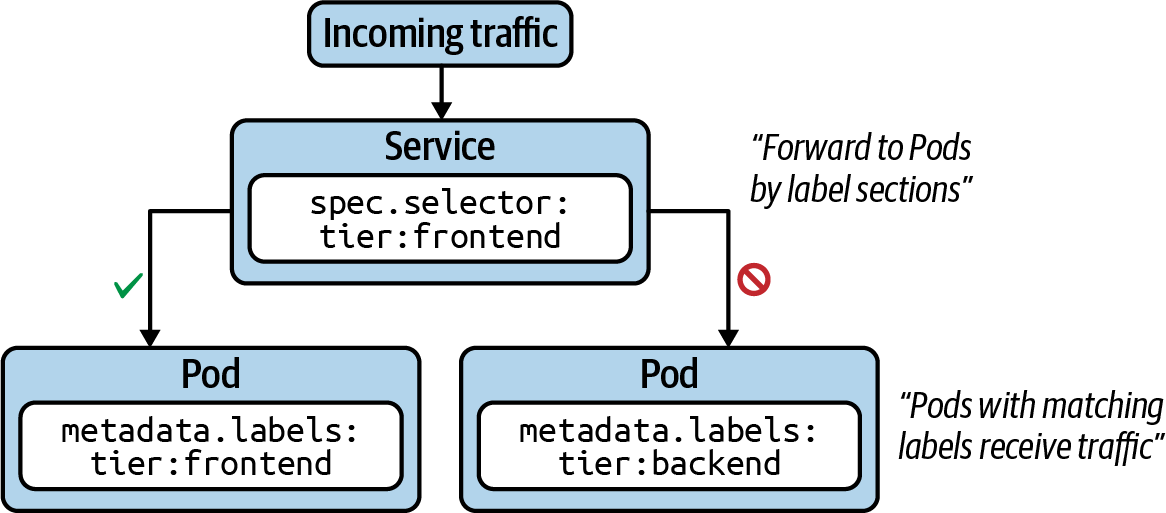
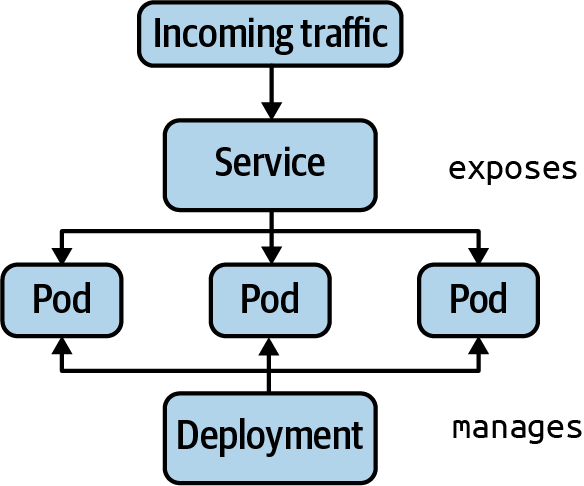
Services are one of the central concepts in Kubernetes. Without a Service, you won’t be able to expose your application to consumers in a stable and predictable fashion. In a nutshell, Services provide discoverable names and load balancing to Pod replicas. The services and Pods remain agnostic from IPs with the help of the Kubernetes DNS control plane component. Similar to a Deployment, the Service determines the Pods it works on with the help of label selection.
The following figure shows functionality. Pod 1 and Pod 2 receive traffic, as their assigned labels match with the label selection defined in the Service. Pod 3 does not receive traffic, as it defines non-matching labels. Note that it is possible to create a Service without a label selector for less-common scenarios.
Service Types
Every Service needs to define a type. The type determines how the Service exposes the matching Pods, as listed in the following table.
| Type | Description |
|---|---|
| ClusterIP | Exposes the Service on a cluster-internal IP. Only reachable from within the cluster. |
| NodePort | Exposes the Service on each node’s IP address at a static port. Accessible from outside of the cluster. |
| LoadBalancer | Exposes the Service externally using a cloud provider’s load balancer. |
Creating Services
As usual, we’ll look at creating a Service from both the imperative and declarative approach angles. In fact, there are two ways to create a Service imperatively.
The command create service instantiates a new Service. You have to provide the type of the Service as the third, mandatory command-line option. That’s also the case for the default type, ClusterIP. In addition, you can optionally provide the port mapping, which we’ll discuss a little later.
kubectl create service clusterip nginx-service --tcp=80:80
Instead of creating a Service as a standalone object, you can also expose a Pod or Deployment with a single command. The run command provides an optional --expose command-line option, which creates a new Pod and a corresponding Service with the correct label selection in place:
kubectl run nginx --image=nginx --restart=Never --port=80 --expose
For an existing Deployment, you can expose the underlying Pods with a Service using the expose deployment command:
kubectl expose deployment my-deploy --port=80 --target-port=80
Using the declarative approach:
apiVersion: v1
kind: Service
metadata:
  name: nginx-service
spec:
  type: ClusterIP
  selector:
    app: nginx-service
  ports:
  - port: 80
    targetPort: 80
Port Mapping
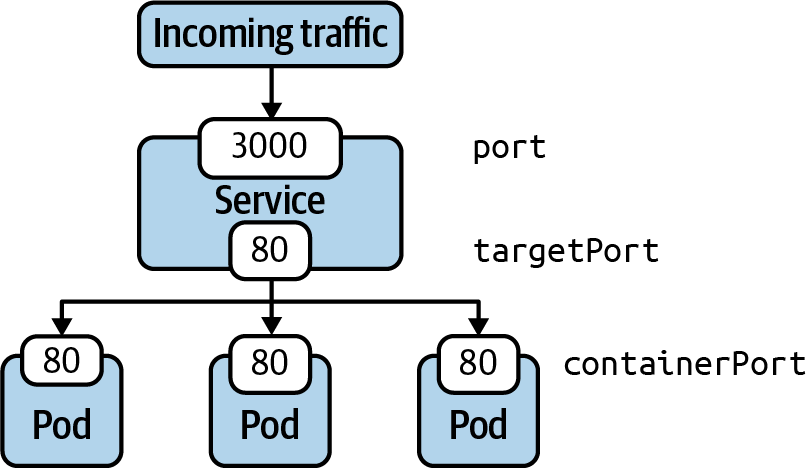
We briefly touched on the topic of port mapping. The correct port mapping determines if the incoming traffic actually reaches the application running inside of the Pods that match the label selection criteria of the Service. A Service always defines two different ports: the incoming port accepting traffic and the outgoing port, also called the target port. Their functionality is best illustrated by example.
The following figure shows a Service that accepts incoming traffic on port 3000. That’s the port defined by the attribute ports.port in the manifest. Any incoming traffic is then routed toward the target port, represented by ports.targetPort. The target port is the same port as defined by the container running inside of the label-selected Pod. In this case, that’s port 80.
Accessing a Service with Type ClusterIP
ClusterIP is the default type of Service. It exposes the Service on a cluster-internal IP address. The following figure shows how to reach a Pod exposed by the ClusterIP type from another Pod from within the cluster. You can also create a proxy from outside of the cluster using the kubectl proxy command.
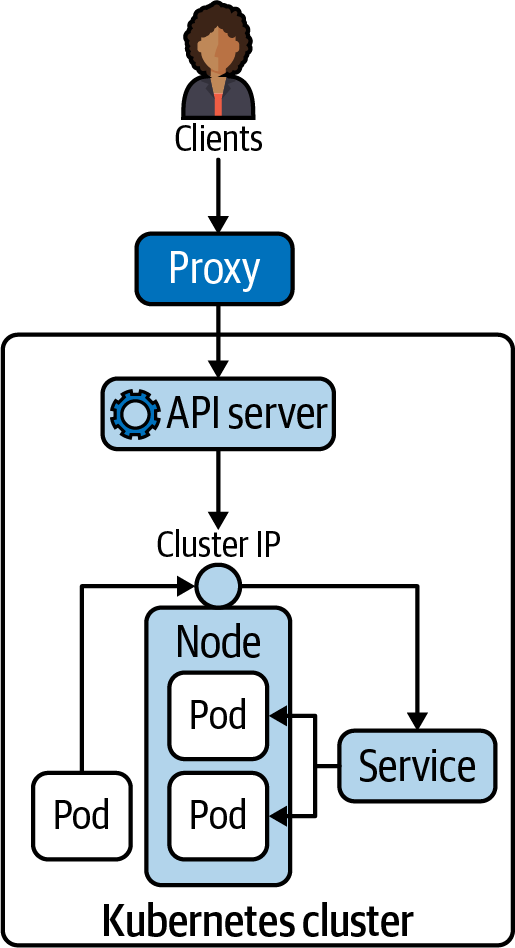
The proxy command can establish a direct connection to the Kubernetes API server from your localhost. With the following command, we are opening port 9999 on which to run the proxy:
kubectl proxy --port=9999
After running the command, you will notice that the shell is going to wait until you break out of the operation. To try talking to the proxy, you will have to open another terminal window. Say you have the curl command-line tool installed on your machine to make a call to an endpoint of the API server. The following example uses localhost:9999—that’s the proxy entry point. As part of the URL, you’re providing the endpoint to the Service named nginx running in the default namespace:
curl -L localhost:9999/api/v1/namespaces/default/services/nginx/proxy
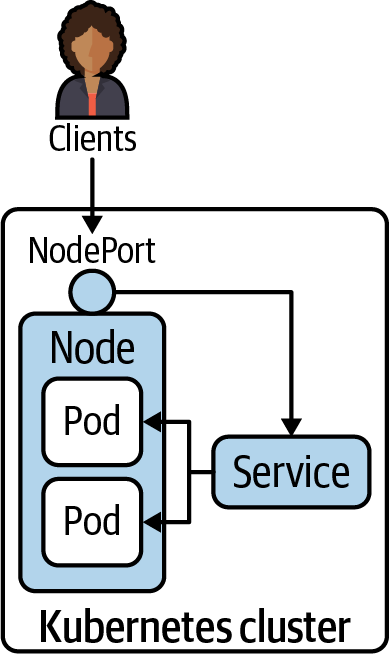
Accessing a Service with Type NodePort
Declaring a Service with type NodePort exposes access through the node’s IP address and can be resolved from outside of the Kubernetes cluster. The node’s IP address can be reached in combination with a port number in the range of 30000 and 32767, assigned automatically upon the creation of the Service. The following figure shows the routing of traffic to Pods via a NodePort-typed Service.
We’ll change the existing Service named nginx to use the type NodePort instead of ClusterIP:
kubectl edit service nginx
curl localhost:<port-number>
Deployments and Services
A Deployment manages Pods and their replication. A Service routes network requests to a set of Pods. Both primitives use label selection to connect with an associated set of Pods.
Assignment 01
Part 01
Assume an application stack that defines three different layers: a frontend, a backend, and a database. Each of the layers runs in a Pod. You can find the definition in the YAML file app.yaml:
kind: Pod
apiVersion: v1
metadata:
  name: frontend
  namespace: app-stack
  labels:
    app: todo
    tier: frontend
spec:
  containers:
  - name: frontend
    image: nginx

---

kind: Pod
apiVersion: v1
metadata:
  name: backend
  namespace: app-stack
  labels:
    app: todo
    tier: backend
spec:
  containers:
  - name: backend
    image: nginx

---

kind: Pod
apiVersion: v1
metadata:
  name: database
  namespace: app-stack
  labels:
    app: todo
    tier: database
spec:
  containers:
  - name: database
    image: mysql
    env:
    - name: MYSQL_ROOT_PASSWORD
      value: example
Create the namespace and the Pods using the file app.yaml.
Part 02
Create a network policy in the file app-network-policy.yaml. The network policy should allow incoming traffic from the backend to the database but disallow incoming traffic from the frontend.
Part 03
Reconfigure the network policy to only allow incoming traffic to the database on TCP port 3306 and no other port.
Assignment 02
Part 01
Create a Pod YAML file with two containers that use the image alpine:3.12.0. Provide a command for both containers that keep them running forever.
Part 02
Define a Volume of type emptyDir for the Pod. Container 1 should mount the Volume to path /etc/a, and container 2 should mount the Volume to path /etc/b.
Part 03
Open an interactive shell for container 1 and create the directory data in the mount path. Navigate to the directory and create the file hello.txt with the contents “Hello World.” Exit out of the container.
Part 04
Open an interactive shell for container 2 and navigate to the directory /etc/b/data. Inspect the contents of file hello.txt. Exit out of the container.
Part 05
Create a PersistentVolume named logs-pv that maps to the hostPath /var/logs. The access mode should be ReadWriteOnce and ReadOnlyMany.
Final
In this assignment, you will create a full stack application with React and AWS that generates obituaries for people (fictional or otherwise). You will use ChatGPT to generate an obituary, Amazon Polly to turn the obituary into speech, and Cloudinary to store the speech and a picture of the deceased (may they rest in peace).
Architecture Overview

Steps
- Make sure to see the demo video on D2L
- Clone the repo
- Make sure you're inside the root directory of the repo and then run
npm installto install all the necessary packages - Run
npm startand you should be able to see the page open up on your default browser - Add your infrastructure code in the
main.tffile - Add your function code for the
get-obituariesfunction in thefunctions/get-obituaries/main.pyfile - Add your function code for the
create-obituaryfunction in thefunctions/create-obituary/main.pyfile - Push your changes to the
mainbranch before the deadline to be graded - This assignment has a DEMO component that's 50% of the grade
Notes
-
You must create all your resources on AWS with Terraform. Put all your configuration in the
main.tffile -
You must use AWS DynamoDB for the database
-
You must use Lambda Function URLs for this assignment to connect your backend to the frontend
-
You must create 2 Lambda functions for this assignment:
get-obituaries: to retrieve all the obituaries. Function URL only allowsGETrequestscreate-obituary: to create a new obituary. The function reads all the data (including the picture) from the body of the request. Function URL only allowsPOSTrequests
-
You must use Python to write the functions
-
The only external libraries allowed to be used in the functions are
requestsfor sending HTTPS requests to ChatGPT and Cloudinary, and requests-toolbelt for decoding the body of the request received from the front-end. No other external libraries are allowed -
You must use the Cloudinary Upload API and not the SDK to interact with Cloudinary. You will need to generate a signature for your requests. See how you can do it here
-
You must use the ChatGPT API and not the SDK to interact with ChatGPT
-
To interact with Cloudinary and ChatGPT, you need keys. You must use AWS Systems Manager Parameter Store and the
SecureStringdata type to store the keys for your Cloudinary and ChatGPT accounts. Thecreate-obituaryLambda function will read the keys from the Parameter Store using theboto3library. The keys must not be present in your application or infra code in the repo. You can create these keys using the AWS CLI, or manually on the AWS Console. Read more about the AWS Systems Manager API here. Depending on your solution, you need one of these two methods:get_parametersorget_parameters_by_path. The Demo uses the last one -
You must use Amazon Polly to turn the obituary written by ChatGPT to speech and then upload the
mp3version of that to Cloudinary. Read more about the Polly API here. What you need is thesynthesize_speechmethod -
The Demo uses the
text-curie-001model from ChatGPT. Feel free to use another model. Be careful about the cost of the model you choose! -
The Demo sets the
max_tokensto 600. However, you could change this number as long as it still works properly. You don't have to go over 600. Bigger numbers are more expensive! -
The Demo uses the Completions API and not the Chat API, as the application doesn't need to have a continuous discussion with the model. This makes the application less expensive. However, feel free to use the Chat API instead
-
The Demo uses the following prompt to interact with the model:
write an obituary about a fictional character named {name} who was born on {born_year} and died on {died_year}.You may use a different prompt as long as it still works -
The Demo uses FlexBox for the layout. However, feel free to use another approach or framework
-
The Demo uses Joanna as the voice id for the speech. Feel free to use another voice id
-
The Demo uses the
e_art:zorroenhancement from Cloudinary to create black edges for the picture. Read more here. You only need to adde_art:zorroin a certain part of the image URL -
You probably need to set a bigger timeout for your Lambda function, as it takes ChatGPT a few seconds to generate an obituary. The default timeout is 3 seconds. You can set the timeout to 20
-
The Demo uses a font from the Google Fonts library named Satisfy to show the obituaries on the front-end,
-
The Demo doesn't use any external library for the front-end
-
In order to get the full mark, you need to DEMO your work in PERSON. You could either demo it to a TA or the instructor. Demo is 50% of the assignment
Things you may change
- You may use a CSS framework to build the UI. The Demo only uses FlexBox
- You may use a different voice id with Amazon Polly. The Demo uses Joanna
- You may use a different model for your ChatGPT integration. The Demo uses
text-curie-001 - You may use a different prompt for the model as long as the final result is the same. The Demo uses
write an obituary about a fictional character named {name} who was born on {born_year} and died on {died_year}. - You may use a different font. The Demo uses Satisfy
Cost
- This assignment won't cost you anything if you follow the best practices discussed in the class
- Use the
PROVISIONEDbilling mode, and only 1 RCU and WCU for your DynamoDB table as shown in the lecture notes - Don't use a memory configuration bigger than 128MB for your Lambdas. Use the lecture notes to create Lambda functions. When you don't specify the
memory_sizefield, it will default to 128MB which is the minimum amount - Don't send a huge number of requests to your Lambdas using automated scripts. You have 1 Million free requests, and up to 3.2 million seconds of free compute time under the Free Tier
- Remember to enable Free Tier notifications on your account before building anything as shown in the videos on D2L
- If you go over the Free Tier (you would have to screw it up really bad, honestly), you can create a new Free AWS account and build your infrastructure there instead. Thankfully, Terraform makes that process super easy for you
- Cloudinary has a generous free tier. If you don't send thousands of requests for large files, you won't have to pay anything. If you're over the free tier, you could create a new free account (will give you new keys)
- ChatGPT has a free tier. If you're careful, you won't have to pay anything. If you're over the free tier, you could create a new free account (will give you new API Key)
Bonus Marks
- You can grab 10 extra points if you orchestrate different steps of the
create-obituaryLambda function with AWS Step Functions. You would have to orchestrate 4 Lambda functions:generate-obituarythat uses ChatGPTread-obituarythat uses Amazon Pollystore-filesthat uses Cloudinary to store both the picture and speechsave-itemthat uses DynamoDB to store a new item
- You must create all the infra using Terraform
- Step Functions won't send you a response right away, but the app still needs to find out when the workflow is finished and add a new obituary to the front-end
- No partial implementation is considered. If the implementation doesn't work properly from beginning to end, there will be no bonus marks for the assignment